
Placing and Connecting Coapt Dome Electrodes
If you’ve performed the discussion and palpation steps of the Electrode Site Planning for Coapt pattern recognition, you will have a good idea of the underlying muscle “areas of interest” on your user’s residual limb. Perhaps you’ve even made a series of temporary markings on their limb or taken some pictures for planning.
Now you are ready to place the electrodes in the socket/liner interface. This section will guide you if this is your first Coapt fitting and provide useful tips if you’re already a pro.
A few very important things to know before you get started:
- Electrode contacts with a Coapt system are solid Stainless Steel Dome Electrodes. Each one will be connected to a wired lead of a Coapt cable harness as described below.
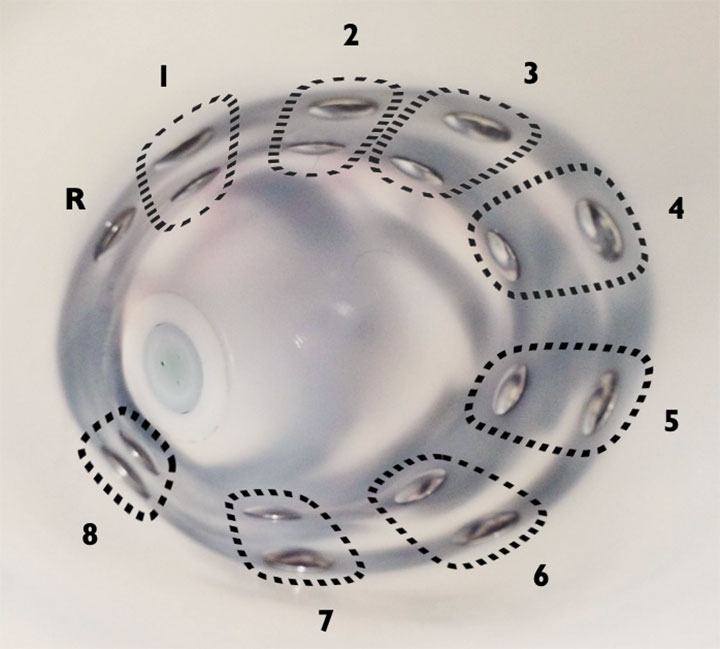
- Two Dome Electrodes work together to create one “channel” of EMG information.
- If you picture an imaginary oval encircling the two placed Dome Electrode contact points, this is the general region the EMG channel data will be from. The farther apart the pair of Dome Electrodes, the larger (and deeper) the sensed area will be. Conversely, Dome Electrodes close to each other will detect a more focused channel of EMG.
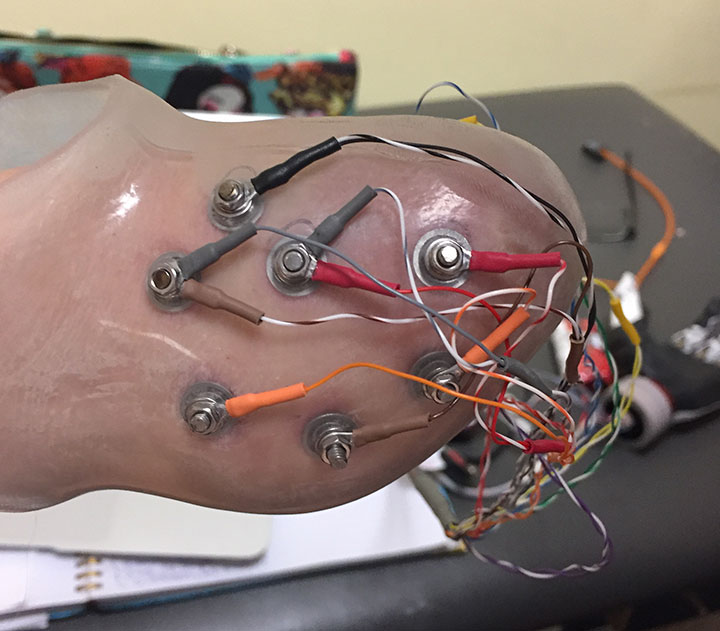
- The Coapt system has 8 EMG channels (16 Dome Electrode contact points) and one ground/reference contact (17 Dome Electrode contact points in total).
- In some space-constrained fittings, the 17 Coapt Dome Electrodes can be reduced to as few as 9, by way of contact-sharing (see below for details).
The most important thing to remember with electrodes: Dome Electrodes MUST MAKE CONTACT WITH THE SKIN to work. Electrodes that don’t stay in contact with the user’s skin will lead to serious prosthesis control limitations. Take care in planning and be sure to fabricate a well-fitting interface for all fittings.
The positioning of electrode contacts should:
- Cover the areas of interest discovered during Palpation.
- Plan accordingly for socket/liner constraints.
A helpful approach to positioning the electrode contacts:
- Consider starting with locations that correspond to existing myosites when retrofitting existing myoelectric users.
- Identify locations to AVOID electrode contact, such as
- Areas that will lose electrode-to-skin contact during use.
- Areas outside of socket trim-lines or co-located with valves.
- Areas that have no underlying muscle (i.e. bone only).
- Sensitive skin areas.
- Areas with active EMG during positional loading (e.g. deltoids, brachioradialis).
Contact Spacing – Plan to place the two electrode contacts for an EMG channel approximately 30–60 mm apart.
Contact-Pair Orientation – While it is generally a good idea to align a pair of contacts in the direction of underlying muscle fiber direction, it is ok with pattern recognition to place some of the electrode pairs “off-axis”. This is helpful when fitting a residual limb with unique areas of EMG interest, and for geometrically unique and congenital limb presentations.
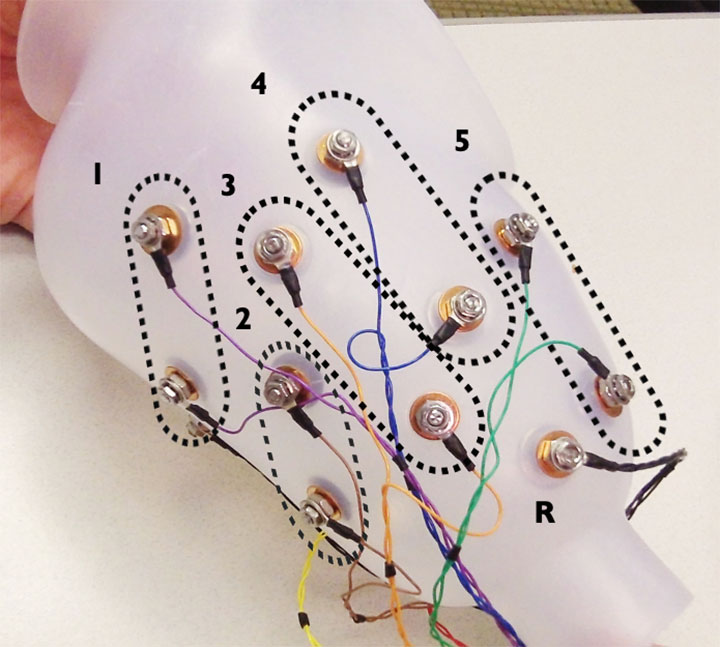
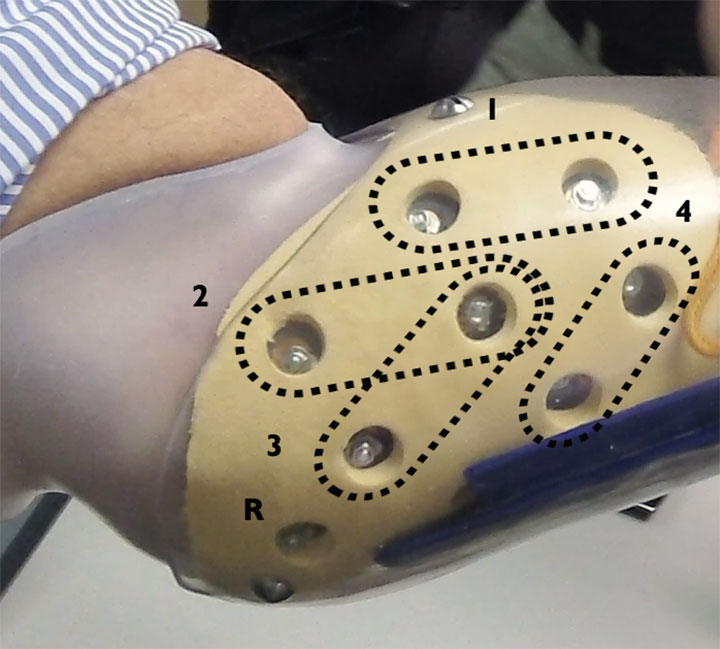
Contact Sharing – For a limb that is too small to reliably fit all 17 Dome Electrode contacts, it is acceptable to have a few of the EMG channels share an electrode contact. Take care, however, that you do not place the two wires for any EMG channel (same color) on the same Dome Electrode—that will result in zero signal for that channel and not be helpful for pattern recognition. are NOT sharing a single Also very important: All Coapt Conductor wires must be connected to a Dome Electrode contact.
Single Reference (Ground) Contact – The Coapt system requires a single Dome Electrode contact for purposes of EMG reference/ground. This contact should NOT be shared with any other EMG signal wires. The reference contact should be positioned in a location that maintains excellent electrode-skin contact.
Contact your Coapt representative with any questions about myotesting and/or electrode placement. Coapt is willing and able to assist with placement instruction and suggestion—these can often be accomplished by submitting socket and/or limb shape images to Coapt.
Detailed Assembly Instructions for the Dome Electrodes into the prosthesis:
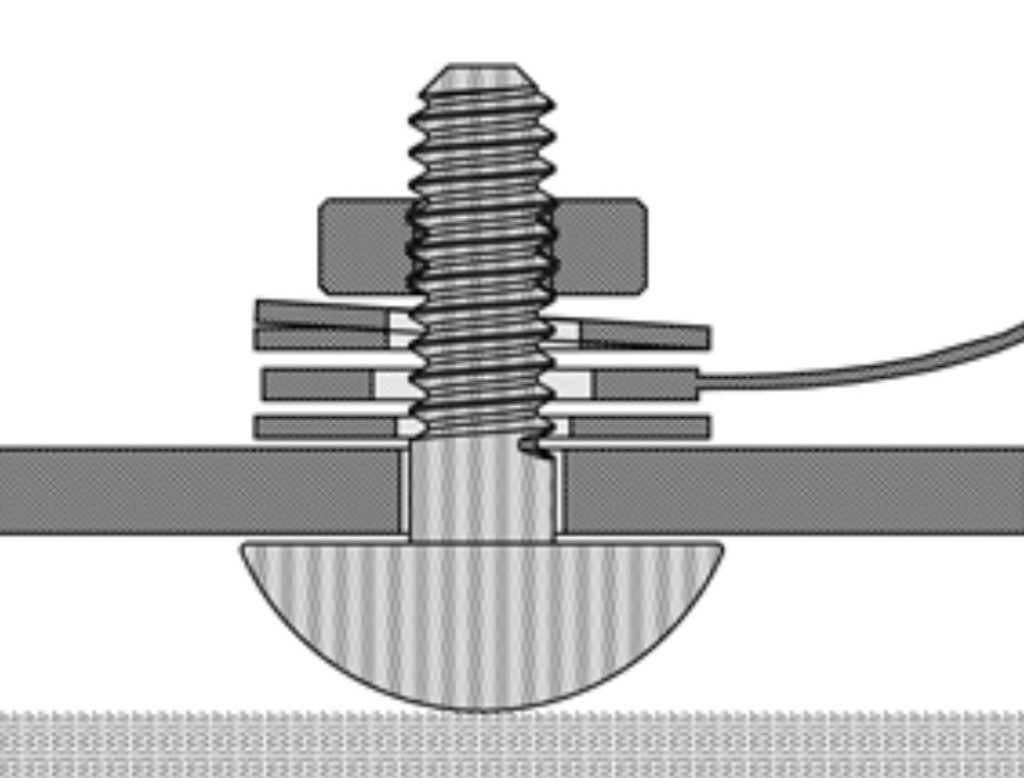
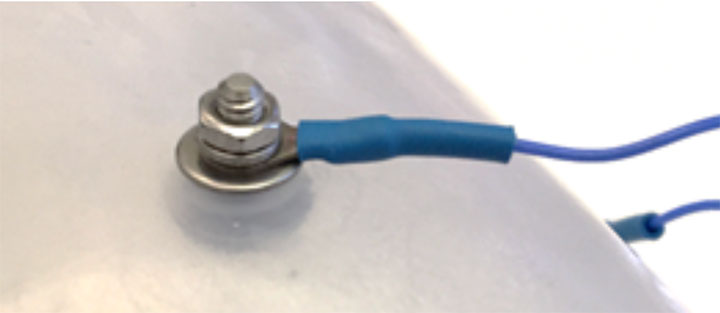
- Push a Dome Electrode through each #4 mounting hole you’ve made in the prosthesis’ inner socket/liner interface. Place it so the dome side will make contact with the skin of the user, and the thread is on the outer side of the socket wall.
- Place a provided Flat Washer on the threaded side of each Dome Electrode.
- Place the ring terminal of a conductor cable on top of each Flat Washer. Same-color conductor cables should be planned for nearby Dome Electrodes.
- If you are “sharing” a Dome Electrode, place the other conductor cable(s) ring terminal(s) (different color(s)) on this threaded stud. Keep in mind that same-color conductors must NOT share the same Dome Electrode. Also, make sure the black (ground) connection is connected to its own Dome Electrode.
- Place a provided Lock Washer next.
- Place and tighten a provided 4-40 Threaded Nut to secure the assembly. Make sure it is tight enough that the conductor cable wire cannot be moved side-to-side with your fingers.
- Repeat these steps for each Dome Electrode that needs to be connected to a conductor.
- Do NOT leave any Coapt EMG wires unconnected.
- Do NOT use any liquid threadlocker.
A few things to be careful of when working with the Dome Electrode hardware:
- It’s a good idea to trim the excess threaded stud of each Dome Electrode once installed and tightened, but make sure you smooth, remove, or cover any sharp edges.
- Be careful not to damage other wires when installing the Dome Electrodes.
- If any part of the metal of the Dome Electrodes and the hardware make contact with conductive materials (eg. carbon fiber outer sockets) the EMG signal won’t be as clear. Take caution to avoid that type of contact.
- Make sure the black (ground) connection is connected to its own Dome Electrode.
- Two wire conductors of the same color should NEVER be connected to the same Dome Electrode.
- Don’t cross-thread the nuts on the threaded part of the Dome Electrodes. Try starting the nuts with your fingers first and if not easy to tighten, try adjusting the starting orientation of the nut.
- Make sure the Dome Electrodes are installed with the dome side making contact with the user. The threaded side and other components should be secured behind a mounting socket wall or enclosure.
Need to clean the Dome Electrodes?
- We recommend cleaning of the Dome Electrodes’ skin contact side as needed using isopropyl alcohol on a clean cloth. Avoid using anything abrasive like sandpaper or steel wool.
- These Dome Electrodes are made of a high-grade Stainless Steel. If they appear damaged or corroded, please contact Coapt.